A Simple Card Pile system to Unity UI. This algorithm implementation is for creating linear segments that can be curved along the line.
The entire logic of your deck is up to you. This component is capable of providing the proper position for each card you are going to use at a deck system any, but that's just it! Use this to give your graph implementation the proper positions, rotations, and constraints.
Update the nodes of the pile
        /// <summary>
        /// Update all node positions and rotations.
        /// </summary>
        public void UpdatePile()
Get a Node
public GameObject GetNodeObject(int index)Get a Node Position
        /// <summary>
        /// This is Local Position of the node at <see cref="_pilePanel"/>, this position already offset applied. To know how many offset is applied, take a look at
        /// <see cref="GetNodePositionOffset(int)"/>
        /// </summary>
        /// <param name="index">Node index</param>
        /// <returns></returns>
        public Vector2 GetNodePosition(int index)
Get a Node Position Offset
        /// <summary>
        /// This is the position offset applied exclusively to this node. Take a look at <see cref="SetNodePositionOffset(int, Vector2)"/>
        /// </summary>
        /// <param name="index">Node index</param>
        /// <returns></returns>
        public Vector2 GetNodePositionOffset(int index)
Get a Node Rotation
        /// <summary>
        /// This is the current rotation of the this node, calculed automaticaly to keep a correct direction from line curvature.
        /// A offset roration can be applied to all nodes from <see cref="settings"/> and it will be computed in final rotation.
        /// </summary>
        /// <param name="index">Node index</param>
        /// <returns></returns>
        public Quaternion GetNodeRotation(int index)
Set a offset position to specific node
        /// <summary>
        /// Set a offset position exclusively to this node
        /// <para>- remember to update the pile <see cref="UpdatePile"/>, if you are doing it manually</para>
        /// </summary>
        /// <param name="index"></param>
        /// <param name="offs"></param>
        public void SetNodePositionOffset(int index, Vector2 offs)
Add or Remove a node of the pile
        /// <summary>
        /// Add a new node to pile if the current <see cref="nodes"/> is less <see cref="PileSettings.MaxNodes"/>
        /// <para>- remember to update the pile <see cref="UpdatePile"/>, if you are doing it manually</para>
        /// </summary>
        public void AddNode()
        /// <summary>
        /// Remove a node from pile if exist.
        /// <para>- remember to update the pile <see cref="UpdatePile"/>, if you are doing it manually</para>
        /// </summary>
        public void RemoveNode()
How to use: 1 - Create your own implementation of thePileBehaviour. This can be very simple to start.
using System.Collections;
using System.Collections.Generic;
using UnityEngine;
using CardPile;

public class PileController : PileBehaviour
{
    private void Update()
    {
        UpdatePile();
    }

    protected override void OnNodeAdded(int index)
    {
        Debug.Log(GetNodeObject(index).name);
        Debug.Log(GetNodePosition(index));
        Debug.Log(GetNodeRotation(index));
        Debug.Log(GetNodePositionOffset(index));
    }

    protected override void OnNodeRemoved(int index)
    {

    }

    protected override void OnNodeRemoving(int index)
    {

    }

}
2 - Add you component at any GameObject, but remember that it work with UI, so this component need a (RectTransform) as reference to create the nodes as children. you don't need to add the component in a UI, this is just a convenience. You can place it wherever you want. In my example I put it on the same panel that will be the Parent of all the nodes in the stack
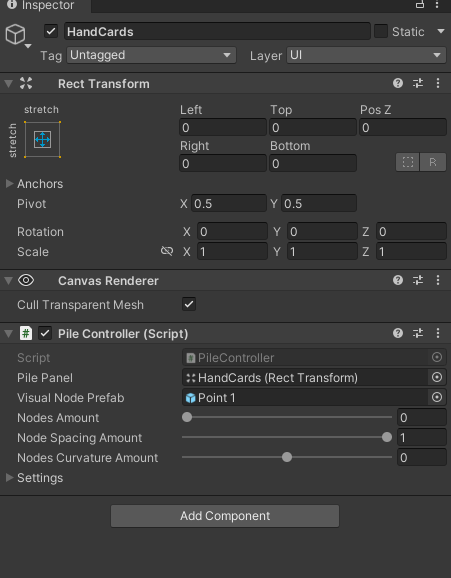
3 - Make sure tjat you have a prefab referenced in the field (Visual Node Prefab).
This can be anything in the format (RectTransform). It will be used as a VISUAL to show you in real time all the nodes created for the stack.
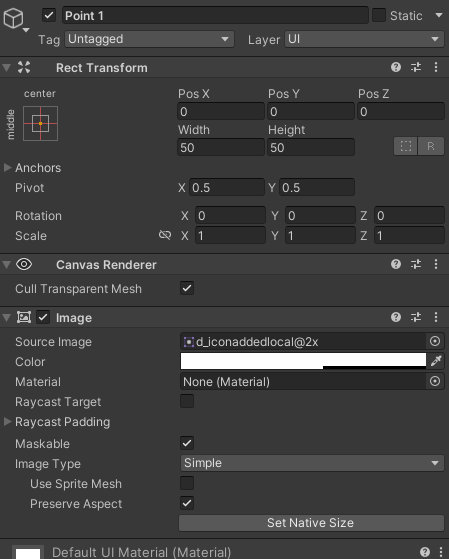
Take a look at my example: This is a simple image 50x50
4 - Play and USE.