Tutorial
This tutorial will guide you through installing dot2net and creating your first network topology.
dot2net implements Topology-driven Configuration, a revolutionary approach that separates network topology from generalized configuration settings. Instead of manually editing multiple device configurations when adding a single router, dot2net generates all required configuration files from a simple topology graph (DOT) and reusable configuration templates (YAML).
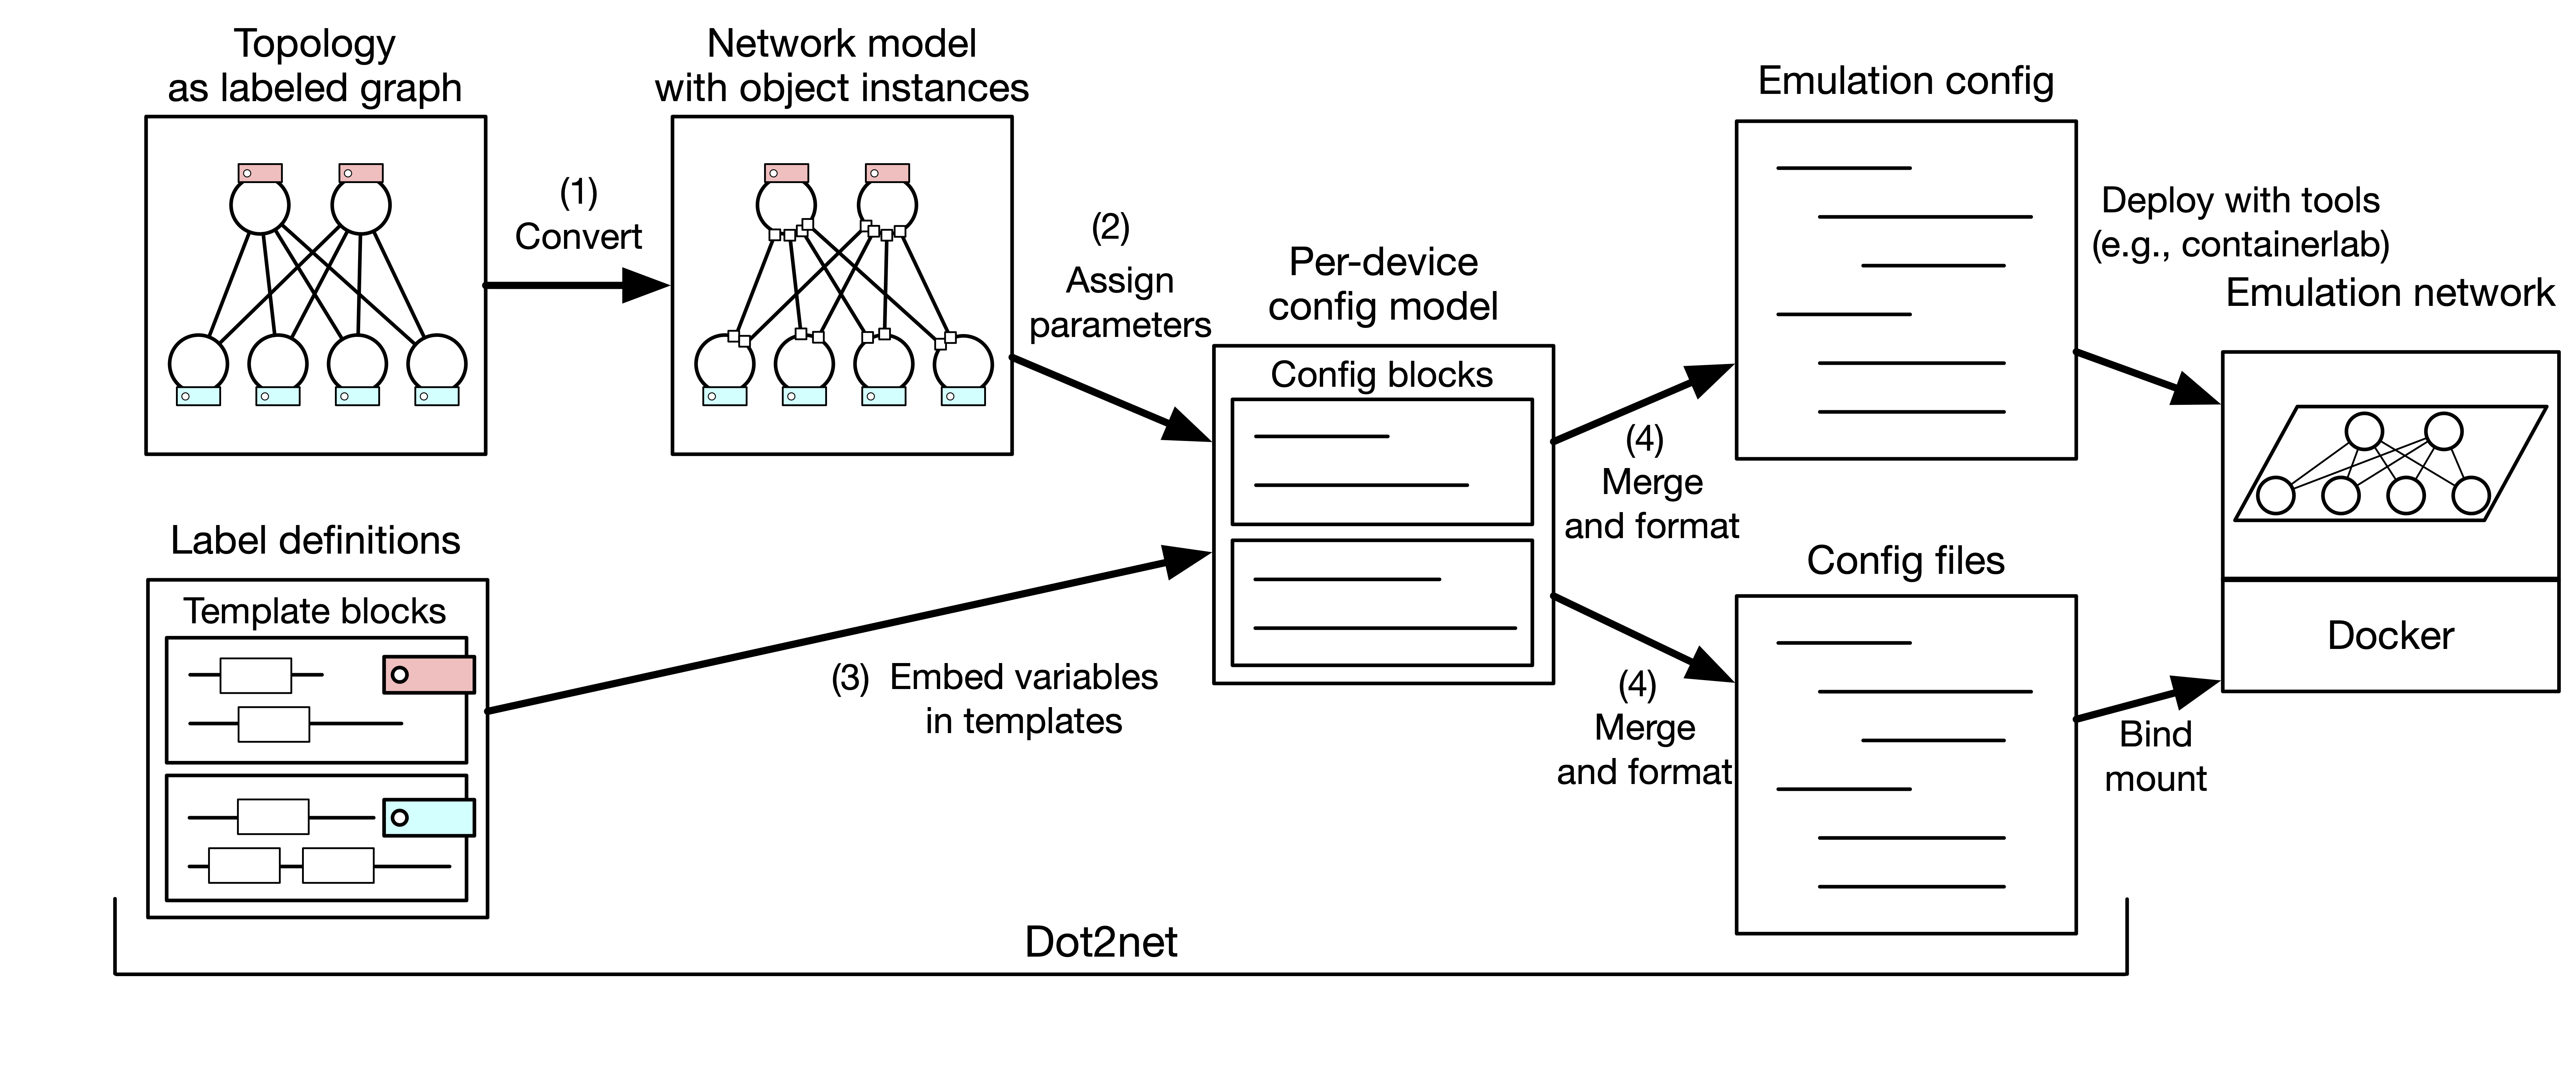
dot2net transforms network topology into emulation-ready configurations through a 4-step process:
- Convert: Parse DOT topology into network model with object instances
- Assign parameters: Automatically calculate IP addresses, interface names, and other parameters
- Embed variables: Process templates with assigned parameters to generate config blocks
- Merge and format: Combine config blocks into final configuration files and deployment specifications
This separation enables topology-driven configuration where changing the network layout only requires modifying the DOT file, while all device configurations are automatically regenerated.
- Go 1.23+ OR Docker
- Using Containerlab/TiNET: Linux environment with Docker and sudo privilege
- Manual deployment: Any environment (dot2net generates config files only)
- Containerlab - container-based network labs
- TiNET - Linux namespace-based emulation
- Manual deployment to physical/virtual equipment
# Clone the repository
git clone https://github.com/cpflat/dot2net.git
cd dot2net

# Build
go build .# Clone the repository
git clone https://github.com/cpflat/dot2net.git
cd dot2net
# Build using Docker
docker run --rm -i -v $PWD:/v -w /v golang:1.23.4 go build -buildvcs=falseAfter building, you'll have a dot2net executable in your current directory.
Let's create a simple 3-router network to understand the basics.
cd tutorial/This directory contains a pre-configured example with:
-
input.dot- Network topology -
input.yaml- Configuration templates
View input.dot:
digraph {
    r1 [xlabel="router"];
    r2 [xlabel="router"];
    r3 [xlabel="router"];

    r1 -> r2 [dir="none"];
    r2 -> r3 [dir="none"];
}
This defines:
- Three routers (r1, r2, r3) with class label "router"
- Two bidirectional connections: r1↔r2 and r2↔r3
../dot2net build -c ./input.yaml ./input.dotThis command:
- Reads the topology from
input.dot - Applies configuration from
input.yaml - Generates output files:
-
r1/,r2/,r3/- Node-specific configuration directories -
topo.yaml- Containerlab deployment specification -
spec.yaml- TiNET deployment specification
-
Choose one deployment method:
# Deploy
sudo containerlab deploy --topo topo.yaml

# Test connectivity
docker exec -it clab-tutorial-r1 ping <r3_ip>

# Cleanup
sudo containerlab destroy --topo topo.yaml# Create network namespace and interfaces
tinet up -c spec.yaml | sudo sh -x
# Apply configurations
tinet conf -c spec.yaml | sudo sh -x
# Test connectivity (from host)
sudo ip netns exec r1 ping <r3_ip>
# Cleanup
tinet down -c spec.yaml | sudo sh -xDefines the network structure using DOT language (Graphviz format):
- Nodes: Network devices (routers, switches, hosts)
- Edges: Connections between devices
- Labels: Class assignments for configuration
Key syntax:
digraph {
    node_name [xlabel="class_label"];
    node1 -> node2 [dir="none"];  # Bidirectional connection
}
Learn more: DOT File Syntax
Defines configuration behavior using YAML:
- Classes: Reusable configuration patterns (NodeClass, InterfaceClass, ConnectionClass)
- Templates: Go template files for generating device configs
- IP Policies: Address assignment rules
Key sections:
classes:
  node:
    router:
      # Router configuration

  interface:
    default:
      # Interface configuration

files:
  - format: ...
    template: ...
Learn more: YAML Configuration
After running dot2net build, you'll see:
-
r1/,r2/,r3/: Node-specific configuration directories- Contains device configs (e.g., FRR
daemons,frr.conf)
- Contains device configs (e.g., FRR
-
topo.yaml: Containerlab deployment specification -
spec.yaml: TiNET deployment specification
dot2net provides powerful features for network configuration management:
- Automatic Parameter Assignment: IP addresses, interface names, and other parameters are calculated automatically
- Flexible Class System: Reusable node, interface, connection, and group configurations
- Template-Based Configuration: Generate any configuration format using Go templates
- Multi-Platform Support: TiNET and Containerlab emulation platforms
- Conflict Detection: Intelligent detection and reporting of configuration conflicts
- Scalable Design: Handle large networks with hundreds of nodes and connections
dot2net generates configurations for multiple deployment platforms:
- TiNET: Linux namespace-based network emulation
- Containerlab: Container-based network labs
- Manual deployment: Use generated configs for physical or virtual equipment
Now that you've created your first network, explore these topics:
- Basic Concepts - Understanding topology-driven configuration
- DOT File Syntax - Learn advanced topology definitions
- YAML Configuration - Master the class system and templates
- Best Practices - Design principles for scalable networks
- Template System - Create custom configuration templates
Problem: go build fails with dependency errors
Solution: Ensure you're using Go 1.23+ and run go mod download
Problem: Docker build fails Solution: Check Docker is running and you have network connectivity
Problem: Containerlab fails with permission error
Solution: Ensure you're using sudo when running containerlab deploy
Problem: TiNET commands fail Solution: TiNET requires Linux with network namespace support. Check you're on a Linux system with proper kernel support.
Problem: dot2net build fails with parsing errors
Solution: Validate your DOT syntax using dot -Tpdf input.dot -o test.pdf to check for syntax errors
Problem: IP address conflicts Solution: Review your YAML configuration's address assignment policies
For more help, visit the GitHub Issues page.