
Catapult defines a best-practice infrastructure so you don't have to - it also aligns with Agile methodologies, like Scrum, to afford you everything you need to develop and deploy a website with ease.

💥 Catapult is a complete website and workflow management platform built from leading and affordable technologies.
🌎 Our mission is to create a lean platform which orchestrates DevOps for website lifecycles with familiar technologies.
🚀 Our vision is to afford organizations reduced risk and improved performance while lowering barriers to entry.
Do you need a website and workflow management platform? Here are a few triggers.
- Production is down.
- We need a test site.
- Why is this costing so much?
- Are my environments safe?
- Is my website backed up?
- How quickly can I recover my website after a disaster?
- Can I easily scale my website for more traffic?
- What is my uptime?
What makes Catapult different?
- Catapult is an open source, complete, and distributed architecture
- Catapult only orchestrates - it is not required to run your infrastructure
- Catapult uses platform native shell scripting rather than configuration management tools such as Chef, Puppet, Salt
- Catapult overlays seamlessly with Scrum methodology
- Catapult features Gitflow workflow while enforcing exactly matching, branch-driven environments
- Catapult features a unique workflow model - upstream or downstream
- Catapult is highly cost effective
Go ahead, give Catapult a shot.
Security is very important to us. If you have any issue regarding security, please disclose the information responsibly by sending an email to [email protected] and not by creating a GitHub issue.
Catapult leverages the following technologies and technology services to implement key components of DevOps.
- Configuration Management
- Catapult
- Encryption - GnuPG
- Source Code Management
- Catapult - Git (via GitHub)
- Websites - Git (via GitHub or Bitbucket)
- Environment Management
- Vagrant
- Development Virtualization
- VirtualBox
- Cloud Hosting
- DigitalOcean
- DNS Management
- CloudFlare
- Continuous Integration
- Automated Deployments - Bamboo
- Build Server - Amazon Web Services (AWS)
- Monitoring
- Server Resources - New Relic Servers
- Application Performance - New Relic APM
- Browser Performance - New Relic Browsers
- Website Availability - New Relic Synthetics
Catapult supports and intelligently manages the following software chosen from trending usage statistics from BuiltWith and align with the CentOS 7 trunk:
| Software | Catapult Key | Released | End-of-Life |
|---|---|---|---|
| CodeIgniter 2 | codeigniter2 |
January 28, 2011 | October 31, 2015 |
| CodeIgniter 3 | codeigniter3 |
March 30, 2015 | |
| Drupal 6 | drupal6 |
February 13, 2008 | February 24, 2016 |
| Drupal 7 | drupal7 |
January 5, 2011 | |
| Elgg 1 | elgg1 |
August 20, 2008 | |
| ExpressionEngine 3 | expressionengine3 |
October 13, 2015 | |
| Joomla 3 | joomla3 |
September 27, 2012 | |
| Laravel 5.0.x | laravel5 |
February 4, 2015 | |
| MediaWiki 1 | mediawiki1 |
December 8, 2003 | |
| Moodle 3 | moodle3 |
November 16, 2015 | |
| SilverStripe 3 | silverstripe3 |
June 29, 2012 | |
| SuiteCRM 7 | suitecrm7 |
October 21, 2013 | |
| WordPress >=3.7 | wordpress |
June 17, 2010 | |
| WordPress 4 | wordpress |
September 4, 2014 | |
| XenForo 1 | xenforo |
March 8, 2011 | |
| Zend Framework 2.0.x <=2.4.x | zendframework2 |
September 5, 2012 |
Catapult additionally supports basic PHP projects that do not have a database requirement:
- PHP 5.4 compatible project
The free market and competition is great - it pushes the envelope of innovation. Here, we compare similar platforms to shed light on where we are and we're headed. Catapult's approach is holistic, meaning, there are no optional features - the platform includes everything in its default state and its default state is the only state of the platform. Some platforms offer and support optional third-party features that need configured - these are excluded.
| Platform Feature | Catapult | Pantheon | Acquia |
|---|---|---|---|
| Source | Open | Closed | Closed |
| Subscription Feature Set | Bundled | Separated | Separated |
| Supported Software | Numerous | 2 | 1 |
| Minimum Bundled Monthly Cost |
$40 | $400 | $134 |
| Websites per Instance/Subscription | Unlimited | 1 | 1 |
| Managed Workflow | Git Flow | ❌ | ❌ |
| Managed Workflow Model | Upstream or Downstream | ❌ | ❌ |
| Agile Methodology Focus | Scrum | ❌ | ❌ |
| Managed Continuous Integration | ✅ | ❌ | ❌ |
| Environments | LocalDev, Test, QC, Production | Multidev, Dev, Test, Live | Dev Desktop, Dev, Stage, Prod |
| Exacting Configuration | ✅ | ❌2 | ❌3 |
| Approach | Virtual Machine | Container | Virtual Machine |
| Data Center | DigitalOcean and AWS | Rackspace | AWS |
| Scaling | Vertical | Horizontal | Vertical |
| Scaling Management | Manual | Automatic | Manual |
| Development Environment | Unlimited Local | 5 Cloud | Unlimited Local |
| Development Environment Approach | Exact | Exact | Similar |
| Dashboard - Control | CLI | CLI & Web | CLI & Web |
| Dashboard - Monitor | Web | Web | Web |
| Managed Public Git Website Repository Support | GitHub & Bitbucket | ❌ | ❌ |
| Managed DNS | CloudFlare | ❌ | ❌ |
| Managed Free HTTPS/SSL | CloudFlare | ❌ | ❌ |
| Managed Server Monitoring | New Relic | ❌ | Proprietary |
| Managed Application Error Logs | New Relic | Proprietary | Proprietary |
| Managed Application Performance Monitoring | New Relic | ❌ | ❌ |
| Managed Browser Performance Monitoring | New Relic | ❌ | ❌ |
| Managed Synthetic Monitoring | New Relic | ❌ | ❌ |
See an error or have a suggestion? Email [email protected] - we appreciate all feedback.
- Catapult
- Setup Catapult
- Setup Environments
- Release Management
- Compliance and Security
- Troubleshooting
- Contributing
- Community
Catapult requires a Developer Setup, Instance Setup, and Services Setup as described in the following sections.
Please Note:
- It is advised to turn off any antivirus software that you may have installed during setup and usage of Catapult - tasks such as forwarding ports and writing hosts files may be blocked.
- Virtualizaion must be enabled in the BIOS of the developer's workstation - follow this how-to to get started.
- Using a VPN client during usage of LocalDev may result in lost communication between your workstation and the guests, requiring a
vagrant reloadto regain SSH and/or WinRM communication.
Catapult is controlled via Vagrant and the command line of a developer's workstation - below is a list of required software that will need to be installed.
- OS X workstations: 100% compatabile and tested
- Linux workstations: 100% compatabile and tested
- Windows workstations: Currently limited support
- Vagrant
- Using OS X?
- Ensure Xcode Command Line Tools are installed by running
xcode-select --installfrom Terminal - Download and install the latest verson of Vagrant from https://www.vagrantup.com/downloads.html
- Ensure Xcode Command Line Tools are installed by running
- Using Windows?
- Download and install the latest verson of Vagrant from https://www.vagrantup.com/downloads.html
- Using Linux (Debian, Ubuntu)?
- Download the latest version of Vagrant respective to your architecture from https://releases.hashicorp.com/vagrant/ by running e.g.
wget https://releases.hashicorp.com/vagrant/1.8.1/vagrant_1.8.1_x86_64.deb - Install Vagrant using dpkg e.g.
sudo dpkg --install vagrant_1.8.1_x86_64.deb - Install Network File System (NFS)
sudo apt-get install nfs-kernel-server
- Download the latest version of Vagrant respective to your architecture from https://releases.hashicorp.com/vagrant/ by running e.g.
- Using Linux (Fedora, Red Hat, Suse)?
- Download the latest version of Vagrant respective to your architecture from https://releases.hashicorp.com/vagrant/ by running e.g.
wget https://releases.hashicorp.com/vagrant/1.8.1/vagrant_1.8.1_x86_64.rpm - Install Vagrant using yum e.g.
sudo yum install vagrant_1.8.1_x86_64.rpm
- Download the latest version of Vagrant respective to your architecture from https://releases.hashicorp.com/vagrant/ by running e.g.
- Using OS X?
- Vagrant Plugins
- VirtualBox
- Using OS X?
- Download and install the latest version of VirtualBox from https://www.virtualbox.org/wiki/Downloads
- Using Windows?
- Download and install the latest version of VirtualBox from https://www.virtualbox.org/wiki/Downloads
- Using Linux (Debian, Ubuntu)?
- Download and install the latest version of VirtualBox using Advanced Packaging Tool (APT)
sudo apt-get install virtualbox
- Download and install the latest version of VirtualBox using Advanced Packaging Tool (APT)
- Using Linux (Fedora, Red Hat, Suse)?
- Download and install the latest version of VirtualBox using Yellowdog Updater, Modifed (yum)
sudo yum install virtualbox
- Download and install the latest version of VirtualBox using Yellowdog Updater, Modifed (yum)
- Using OS X?
- GPG2
- Using OS X?
- Download and install GPG Suite from https://gpgtools.org
- Using Windows?
- Download and install Gpg4win from http://gpg4win.org/download.html
- Using Linux?
- GPG is included in the base distribution in most cases.
- If being prompted by the Passphrase GUI Agent, comment out 'use-agent' in
~/.gnupg/gpg.conf
- Using OS X?
- Git
- Using OS X?
- Git commandline is included in the base distribution in most cases.
- For a streamlined Git GUI, download and install SourceTree from https://www.sourcetreeapp.com/
- Using Windows?
- Download and install SourceTree from https://www.sourcetreeapp.com/
- Using Linux?
- Git commandline is included in the base distribution in most cases.
- For a streamlined Git GUI, download and install SmartGit from http://www.syntevo.com/smartgit/
- Using OS X?
- Terminal
- Using OS X?
- The terminal in the base distrubitions are 100% compatible.
- Using Windows?
- Download and install Cygwin from https://cygwin.com/install.html
- Make sure to install the openssh package
- Run all Vagrant commands from within the Cygwin terminal.
- Make sure to open Cygwin terminal as Administrator by right-clicking and selecting "Open as Administrator"
- Download and install Cygwin from https://cygwin.com/install.html
- Using Linux?
- The terminal in the base distrubitions are 100% compatible.
- Using OS X?


Having your team use the same tools is beneficial to streamlining your workflow - below is a list of recommended software tools.
- Sublime Text 3
- Please download and install from http://www.sublimetext.com/3
Catapult is quick to setup. Fork the Github repository and start adding your configuration.
- Fork Catapult
- Fork https://github.com/devopsgroup-io/catapult and clone via SourceTree or the git utility of your choice.
- SSH Key Pair
- Create a passwordless SSH key pair - this will drive authentication for Catapult.
- For instructions please see https://help.github.com/articles/generating-ssh-keys/
- Place the newly created passwordless SSH key pair
id_rsaandid_rsa.pubin the~/secrets/folder.
- Create a passwordless SSH key pair - this will drive authentication for Catapult.
- GPG Key
- Generate a GPG key - this will drive encryption for Catapult.
- NEVER SHARE THE KEY WITH ANYONE OTHER THAN YOUR TEAM.
- Spaces are not permitted and must be at least 20 characters.
- To create a strong key, please visit https://xkpasswd.net/
- Place your newly generated GPG key at
~/secrets/configuration-user.yml["settings"]["gpg_key"] - It is recommended to print a QR code of the key to distribute to your team, please visit http://educastellano.github.io/qr-code/demo/
- Remember! Security is 99% process and 1% technology.
- Generate a GPG key - this will drive encryption for Catapult.
- GPG Edit Mode
- GPG Edit Mode is set at
~/secrets/configuration-user.yml["settings"]["gpg_edit"](falseby default) and is used to encrypt your Catapult configuration secrets using your GPG Key:~/secrets/id_rsaas~/secrets/id_rsa.gpg~/secrets/id_rsa.pubas~/secrets/id_rsa.pub.gpg~/secrets/configuration.ymlas~/secrets/configuration.yml.gpg
- GPG Edit Mode requires that you are on your Catapult fork's
developbranch. - Running any Vagrant command (e.g.
vagrant status) will encrypt your configuration, of which, will allow you to commit and push safely to your public Catapult fork.
- GPG Edit Mode is set at
Catapult is designed with a distributed services model, below are the required third-party services and their sign-up and configuration steps.
| Service | Product | Use Case | Monthly Cost |
|---|---|---|---|
| Cloud Hosting | DigitalOcean | 6 Web and Database Servers | *$30+ |
| Source Code Repositories | Atlassian Bitbucket | Private Repositories | Free |
| Source Code Repositories | GitHub | Public Repositories | Free |
| Continuous Integration | Amazon Web Services (AWS) | Build Server | **$0+ |
| Continuous Integration | Atlassian Bamboo | Deployment Management | $10 |
| DNS | CloudFlare | Cloud DNS | Free |
| Monitoring | New Relic Application (APM), Browser, Server, and ***Synthetics | Performance and Infrastructure Monitoring | Free |
| Total | $40+ |
* Depending on load, resources may need to be increased, starting at an additional $5 per month per server.
** New AWS customers receive 1-year free of micro services. Beyond this period, a few websites with builds running irregularly will generally incur over a couple dollars more per month.
*** New Relic customers receive a trial "pro" period ranging from 14-days to 30-days, however, there is no free tier beyond the trial
- Cloud Hosting:
- DigitalOcean sign-up and configuration
- Create an account at http://digitalocean.com
- [Free Stuff] Get a $10 credit and give us $25 once you spend $25 https://www.digitalocean.com/?refcode=6127912f3462
- Go to your DigitalOcean Applications & API Dashboard https://cloud.digitalocean.com/settings/api
- Create a Personal Access Token named "Vagrant" and place the token value at
~/secrets/configuration.yml["company"]["digitalocean_personal_access_token"]
- Create a Personal Access Token named "Vagrant" and place the token value at
- Go to your DigitalOcean Security Dashboard https://cloud.digitalocean.com/settings/security
- Add a new SSH Key named "Vagrant" with your newly created
id_rsa.pubfrom~/secrets/id_rsa.pubkey
- Add a new SSH Key named "Vagrant" with your newly created
- Create an account at http://digitalocean.com
- Amazon Web Services (AWS) sign-up and configuration
- Create an account https://portal.aws.amazon.com/gp/aws/developer/registration
- [Free Stuff] Receive Free Tier benefits for the first 12 months after signing up https://aws.amazon.com/ec2/pricing/
- Sign in to your new AWS console https://console.aws.amazon.com
- Go to your AWS Identity and Access Management (IAM) Users Dashboard https://console.aws.amazon.com/iam/home#users
- Create a "Catapult" user.
- Place the Access Key ID at
~/secrets/configuration.yml["company"]["aws_access_key"] - Place the Secret Access Key at
~/secrets/configuration.yml["company"]["aws_secret_key"]
- Go to your AWS Identity and Access Management (IAM) Groups Dashboard https://console.aws.amazon.com/iam/home#groups
- Create a "Catapult" group.
- Attach the "AmazonEC2FullAccess" policy to the "Catapult" group.
- Go back to your AWS Identity and Access Management (IAM) Groups Dashboard https://console.aws.amazon.com/iam/home#groups
- Select your newly created "Catapult" group.
- Select Add Users to Group and add your newly created "Catapult" user.
- Go to your AWS EC2 Key Pairs Dashboard https://console.aws.amazon.com/ec2/home#KeyPairs
- Click Import Key Pair
- Add your newly created
id_rsa.pubfrom~/secrets/id_rsa.pubkey - Set the Key pair name to "Catapult"
- Go to your AWS EC2 Security Groups Dashboard https://console.aws.amazon.com/ec2/home#SecurityGroups
- Select the "default" Group Name
- Select the Inbound tab and click Edit
- Change Source to "Anywhere"
- Click Save
- Create an account https://portal.aws.amazon.com/gp/aws/developer/registration
- DigitalOcean sign-up and configuration
- Repositories:
Bitbucket provides free private repositories and GitHub provides free public repositories, you will need to sign up for both. If you already have Bitbucket and GitHub accounts you may use them, however, it's best to setup a machine user if you're using Catapult with your team.- Bitbucket sign-up and configuration
- Create an account at https://bitbucket.org
- Place the username (not the email address) that you used to sign up for Bitbucket at
~/secrets/configuration.yml["company"]["bitbucket_username"] - Place the password of the account for Bitbucket at
~/secrets/configuration.yml["company"]["bitbucket_password"]
- Place the username (not the email address) that you used to sign up for Bitbucket at
- Add your newly created
id_rsa.pubfrom~/secrets/id_rsa.pubkey in https://bitbucket.org/account/user/`your-user-here`/ssh-keys/ named "Catapult"
- Create an account at https://bitbucket.org
- GitHub sign-up and configuration
- Create an account at https://github.com
- Place the username (not the email address) that you used to sign up for GitHub at
~/secrets/configuration.yml["company"]["github_username"] - Place the password of the account for GitHub at
~/secrets/configuration.yml["company"]["github_password"]
- Place the username (not the email address) that you used to sign up for GitHub at
- Add your newly created
id_rsa.pubfrom~/secrets/id_rsa.pubkey in https://github.com/settings/ssh named "Catapult"
- Create an account at https://github.com
- Bitbucket sign-up and configuration
- Automated Deployments:
2. Bamboo sign-up and configuration
1. Create a Bamboo Cloud account at https://www.atlassian.com/software/bamboo
2. Sign in to your new custom Bamboo instance https://[your-name-here].atlassian.net
3. Place your Bamboo base URL at
~/secrets/configuration.yml["company"]["bamboo_base_url"], the format should be https://[your-name-here].atlassian.net/builds/ 4. Place your Bamboo username (usually admin) at~/secrets/configuration.yml["company"]["bamboo_username"]5. Place your Bamboo password (usually admin) at~/secrets/configuration.yml["company"]["bamboo_password"]6. Click the settings gear from the top right in the header and select Elastic instances: 1. Click Configuration from the left 2. Click Edit configuration 1. Amazon Web Services configuration 1. Set your AWS EC2 "Bamboo" Access Key ID and Secret Access Key from~/secrets/configuration.yml["company"]["aws_access_key"]and~/secrets/configuration.yml["company"]["aws_secret_key"]2. Region:US East (Northern Virginia)2. Automatic elastic instance management 1. Elastic instance management:Custom2. Idle agent shutdown delay:103. Allowed non-Bamboo instances:14. Maximum number of instances to start at once:25. Number of builds in queue threshold:16. Number of elastic builds in queue threshold:17. Average queue time threshold:23. Click Save 7. Click the settings gear from the top right in the header and select Elastic instances: 1. Click Image configurations from the left 1. Disable all of the elastic images 2. Create elastic image configuration: 1. Name:Catapult2. AMI ID:ami-eb5b80803. Instance type:T2 Burstable Performance Micro4. Availability Zone:Chosen by EC25. Product:Linux/UNIX6. Click Save 8. Click Create > Create a new plan from the header: 1. Create Catapult Project and create TEST Plan * Project and build plan name 1. Project > New Project 2. Project name: Catapult 3. Project key: CAT 4. Plan name: TEST 5. Plan key: TEST 6. Plan description: * Link repository to new build plan 1. Repository host: Other > None 2. Create QC Plan * Project and build plan name 1. Project: Catapult 4. Plan name: QC 5. Plan key: QC 6. Plan description: * Link repository to new build plan 1. Repository host: Other > None 2. Create PROD Plan * Project and build plan name 1. Project: Catapult 4. Plan name: PRODUCTION 5. Plan key: PROD 6. Plan description: * Link repository to new build plan 1. Repository host: Other > None - DNS:
- CloudFlare sign-up and configuration
- Create a CloudFlare account at https://www.cloudflare.com
- Sign in to your new CloudFlare account
- Visit your My Account section at https://www.cloudflare.com/a/account/my-account and scroll down to your API Key and place the token value at
~/secrets/configuration.yml["company"]["cloudflare_api_key"] - Place the email address of the email address that you used to sign up for CloudFlare at
~/secrets/configuration.yml["company"]["cloudflare_email"]
- CloudFlare sign-up and configuration
- Monitoring:
- New Relic sign-up and configuration
- Create a New Relic account at http://newrelic.com/
- [Free Stuff] Sign-up up for New Relic and get a Data Nerd shirt! http://newrelic.com/lp/datanerd
- [Free Stuff] Refer Catapult and get a New Relic hoodie! http://newrelic.com/referral
- Sign in to your New Relic account
- Go to your Account Settings > Integrations > API keys.
- Generate and place your REST API key at
~/secrets/configuration.yml["company"]["newrelic_api_key"] - Generate and place your Admin API key at
~/secrets/configuration.yml["company"]["newrelic_admin_api_key"] - Go to your Account Settings > Account > Summary.
- Place your License key at
~/secrets/configuration.yml["company"]["newrelic_license_key"]
- Create a New Relic account at http://newrelic.com/
- New Relic sign-up and configuration
- Verify Configuration:
- To verify all of the configuration that you just set, open your command line and change directory into your fork of Catapult, then run
vagrant status. Catapult will confirm connection to all of the Services and inform you of any problems.
- To verify all of the configuration that you just set, open your command line and change directory into your fork of Catapult, then run
To start using Catapult you will need to Provision Environments and Configure Automated Deployments.
| Environment | LocalDev | Test | QC | Production |
|---|---|---|---|---|
| Server Provider | Locally via VirtualBox | Hosted via DigitalOcean | Hosted via DigitalOcean | Hosted via DigitalOcean |
| Server Provisioning | Manually via Vagrant | Manually via Vagrant | Manually via Vagrant | Manually via Vagrant |
For each Environment you will need to:
- Web Servers
vagrant up ~/secrets/configuration.yml["company"]["name"]-dev-redhatvagrant up ~/secrets/configuration.yml["company"]["name"]-test-redhatvagrant up ~/secrets/configuration.yml["company"]["name"]-qc-redhatvagrant up ~/secrets/configuration.yml["company"]["name"]-production-redhat
- Database Servers
vagrant up ~/secrets/configuration.yml["company"]["name"]-dev-redhat-mysqlvagrant up ~/secrets/configuration.yml["company"]["name"]-test-redhat-mysqlvagrant up ~/secrets/configuration.yml["company"]["name"]-qc-redhat-mysqlvagrant up ~/secrets/configuration.yml["company"]["name"]-production-redhat-mysql
Once the Web and Database Servers are up and running, it's then time to configure your Bamboo Catapult project's TEST, QC, and PROD plans.
- Sign in to your new custom Bamboo instance https://[your-name-here].atlassian.net
- Click Build > All build plans from the header:
- From the Build Dashboard and under the Catapult project:
- Configure Catapult Project TEST Plan
- Click the edit icon for the TEST plan
- From the Stages tab, select Default Job
- Remove all tasks that may have been added by default during initial setup
- Click Add task
- Search for SSH Task and select it
- Host:
~/secrets/configuration.yml["environments"]["test"]["servers"]["redhat"]["ip"] - Username:
root - Authentication Type:
Key without passphrase - SSH Key:
~/secrets/id_rsa - SSH command:
bash /catapult/provisioners/redhat/provision.sh "test" "https://github.com/[your-name-here]/catapult" "~/secrets/configuration-user.yml["settings"]["gpg_key"]" "apache" - Click Save
- Click Add task
- Search for SSH Task and select it
- Host:
~/secrets/configuration.yml["environments"]["test"]["servers"]["redhat_mysql"]["ip"] - Username:
root - Authentication Type:
Key without passphrase - SSH Key:
~/secrets/id_rsa - SSH command:
bash /catapult/provisioners/redhat/provision.sh "test" "https://github.com/[your-name-here]/catapult" "~/secrets/configuration-user.yml["settings"]["gpg_key"]" "mysql" - Click Save
- Configure Catapult Project QC Plan
- Click the edit icon for the QC plan
- From the Stages tab, select Default Job
- Remove all tasks that may have been added by default during initial setup
- Click Add task
- Search for SSH Task and select it
- Host:
~/secrets/configuration.yml["environments"]["qc"]["servers"]["redhat"]["ip"] - Username:
root - Authentication Type:
Key without passphrase - SSH Key:
~/secrets/id_rsa - SSH command:
bash /catapult/provisioners/redhat/provision.sh "qc" "https://github.com/[your-name-here]/catapult" "~/secrets/configuration-user.yml["settings"]["gpg_key"]" "apache" - Click Save
- Click Add task
- Search for SSH Task and select it
- Host:
~/secrets/configuration.yml["environments"]["qc"]["servers"]["redhat_mysql"]["ip"] - Username:
root - Authentication Type:
Key without passphrase - SSH Key:
~/secrets/id_rsa - SSH command:
bash /catapult/provisioners/redhat/provision.sh "qc" "https://github.com/[your-name-here]/catapult" "~/secrets/configuration-user.yml["settings"]["gpg_key"]" "mysql" - Click Save
- Configure Catapult Project PRODUCTION Plan
- Click the edit icon for the PRODUCTION plan
- From the Stages tab, select Default Job
- Remove all tasks that may have been added by default during initial setup
- Click Add task
- Search for SSH Task and select it
- Host:
~/secrets/configuration.yml["environments"]["production"]["servers"]["redhat"]["ip"] - Username:
root - Authentication Type:
Key without passphrase - SSH Key:
~/secrets/id_rsa - SSH command:
bash /catapult/provisioners/redhat/provision.sh "production" "https://github.com/[your-name-here]/catapult" "~/secrets/configuration-user.yml["settings"]["gpg_key"]" "apache" - Click Save
- Click Add task
- Search for SSH Task and select it
- Host:
~/secrets/configuration.yml["environments"]["production"]["servers"]["redhat_mysql"]["ip"] - Username:
root - Authentication Type:
Key without passphrase - SSH Key:
~/secrets/id_rsa - SSH command:
bash /catapult/provisioners/redhat/provision.sh "production" "https://github.com/your-name-here/catapult" "~/secrets/configuration-user.yml["settings"]["gpg_key"]" "mysql" - Click Save
- Configure Catapult Project TEST Plan
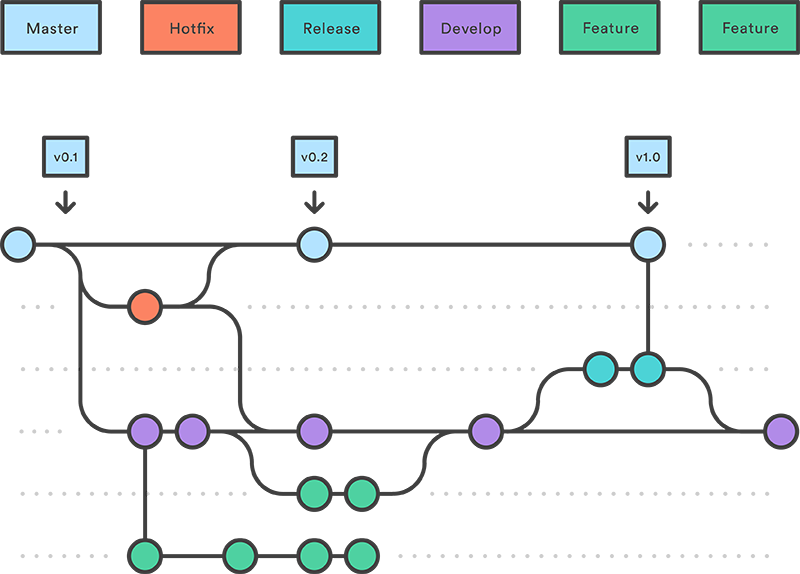
Catapult follows Gitflow for its infrastructure configuration and website development model - each environment runs a specific branch and changesets are introduced into each environment by pull requests from one branch to the next.
| Environment | LocalDev | Test | QC | Production |
|---|---|---|---|---|
| Running Branch | develop | develop | release | master |
| Deployments | Manually via vagrant provision |
Automatically via Bamboo (new commits to develop) | Automatically via Bamboo (new commits to release) | Manually via Bamboo |
| Testing Activities | Component Test | Integration Test, System Test | Acceptance Test, Release Test | Operational Qualification |
| Scrum Activity | Sprint Start: Development of User Stories | Daily Scrum | Sprint Review | Sprint End: Accepted Product Release |
| Scrum Roles | Development Team | Scrum Master, Development Team, Product Owner (optional) | Scrum Master, Development Team, Product Owner | Product Owner |
| Downstream Software Workflow - Database | Restore from develop ~/_sql folder of website repo |
Restore from develop ~/_sql folder of website repo |
Restore from release ~/_sql folder of website repo |
Auto-commit one backup per day (up to 500MB or 1) to master ~/_sql folder of website repo during deploy |
| Downstream Software Workflow - Untracked File Stores | rsync file stores from Production | rsync file stores from Production | rsync file stores from Production | Pull file stores from master |
| Downstream Software Workflow - Tracked File Stores | Pull file stores from develop | Pull file stores from develop | Pull file stores from release | Auto-commit file stores (up to 750MB each) to master of website repo during deploy |
| Upstream Software Workflow - Database | Restore from develop ~/_sql folder of website repo |
Auto-commit one backup per day (up to 500MB or 1) to develop ~/_sql folder of website repo during deploy |
Restore from release ~/_sql folder of website repo |
Restore from master ~/_sql folder of website repo |
| Upstream Software Workflow - Untracked File Stores | rsync file stores from Test | Pull file stores from develop | rsync file stores from Test | rsync file stores from Test |
| Upstream Software Workflow - Tracked File Stores | Pull file stores from develop | Auto-commit file stores (up to 750MB each) to develop of website repo during deploy | Pull file stores from release | Pull file stores from master |
NOTE: Catapult will automatically pull master into develop when in the Downstream Software Workflow direction.
All Catapult configuration is stored in ~/secrets/configuration.yml and encrypted as ~/secrets/configuration.yml.gpg. There are three main sections - Company, Environments, and Websites.
The exclusive Company entry contains top-level company information and service credentials, configured during Setup Catapult.
name:- required: yes
- Your company's name or your name
- required: yes
email:- required: yes
- The primary contact email
- required: yes
timezone_redhat:- required: yes
- Your company's timezone in tz database format
- See this list for a list of valid tz database format timezones
- required: yes
timezone_windows:- required: yes
- Your company's timezone in Windows Standard Format
- See this list for a list of valid Windows Standard Format timezones
- required: yes
The remaining keys include credentials to services, ideally rotated on a bi-annual basis. When rotated, all Bamboo builds need to be disabled and then the configuration changes merged into all branches of your Catapult's fork (develop > release > master), then builds enabled.
digitalocean_personal_access_tokenbitbucket_usernamebitbucket_passwordgithub_usernamegithub_passwordbamboo_base_urlbamboo_usernameaws_access_keyaws_secret_keybamboo_passwordcloudflare_api_keycloudflare_emailnewrelic_admin_api_keynewrelic_api_keynewrelic_license_key
The setup- and maintenance-free Environments entries contain environment configurations such as IP addresses and system credentials - all of which are automatically set during Setup Catapult and Setup Environments.
Adding websites to Catapult is driven by simple configuration. After establishing a repository at GitHub or Bitbucket, simply add entries to ~/secrets/configuration.yml. The entries must be ordered alphabetically by domain name and all entries exist under the single websites: key as reflected in this example:
websites:
  apache:
  - domain: devopsgroup.io
    repo: [email protected]:devopsgroup-io/devopsgroup-io.git
  - domain: example.com
    repo: [email protected]:example-company/example.com.git
The following options are available:
domain:- required: yes
- example:
domain: example.com- the Production canonical domain name without
www.- one subdomain level is supported (subdomain.example.com)
- this drives the domains of LocalDev (via hosts file) and Test, QC, Production (via CloudFlare)
- dev.example.com, test.example.com, qc.example.com, example.com
- the Production canonical domain name without
domain_tld_override:- required: no
- example:
domain_tld_override: mycompany.com- a domain name under your name server authority to append to the top-level-domain (e.g.
.com)- useful when you cannot or do not wish to host the Test/QC website at the
domain
- useful when you cannot or do not wish to host the Test/QC website at the
- appends the
domain_tld_overridefor Environments- dev.example.com.mycompany.com, test.example.com.mycompany.com, qc.example.com.mycompany.com, example.com.mycompany.com
- PLEASE NOTE: When removing this option from a website with
software:, you need to manually replace URLs in the database respective to thesoftware_workflow:option.- ie
vagrant ssh mycompany.com-test-redhat-mysql php /catapult/provisioners/redhat/installers/wp-cli.phar --allow-root --path="/var/www/repositories/apache/example.com/(webroot if applicable)" search-replace ":\/\/(www\.)?(dev\.|test\.)?(example\.com\.mycompany\.com)" "://example.com" --regex
- ie
- a domain name under your name server authority to append to the top-level-domain (e.g.
force_auth:- required: no
- example:
force_auth: letmein- forces HTTP basic authentication in Test, QC, and Production (see
force_auth_exclude) letmeinis both the username and password
- forces HTTP basic authentication in Test, QC, and Production (see
force_auth_exclude:- required: no
- dependency:
force_auth: - example:
force_auth_exclude: ["production"]- array of select environments ["test","qc","production"] to exclude from the
force_authoption
- array of select environments ["test","qc","production"] to exclude from the
force_https:- required: no
- option:
force_https: true- rewrites all http traffic to https
- subdomains are not supported as limited by CloudFlare
- causes an unsigned cert error in LocalDev
repo:- required: yes
- example:
repo: [email protected]:devopsgroup-io/devopsgroup-io.git- GitHub and Bitbucket over SSH are supported, HTTPS is not supported
software:- required: no
- description: manages many aspects of software respective to each environment for websites with supported software types
- maintains software database config file
- manages tracked and untracked software file stores intelligently via git and rsync
- manages permissions of software file store containers
- manages software operations such as cron, garbage collection, and caches
- manages software database migrations
- manages software database backups and restores intelligently via git
- manages software url references in database
- manages software admininistrator account integrity
- option:
software: codeigniter2 - option:
software: codeigniter3 - option:
software: drupal6 - option:
software: drupal7 - option:
software: elgg1 - option:
software: expressionengine3 - option:
software: joomla3 - option:
software: laravel5 - option:
software: mediawiki1 - option:
software: moodle3 - option:
software: silverstripe3 - option:
software: suitecrm7 - option:
software: wordpress - option:
software: xenforo - option:
software: zendframework2
software_auto_update:- required: no
- dependency:
software: - option:
software_auto_update: true- manages software core and pluggable component (plugins, modules, etc) updates to the latest compatible versions using the software's CLI tool
- updates only occur in the
software_workflowenvironment - not all
softwareis supported, see Software Updates and Fresh Installs
software_dbprefix:- required: no
- dependency:
software: - example:
software_dbprefix: wp_- the value that prefixes table names within the database
- PLEASE NOTE: table prefixes included in software distributions, such as WordPress'
wp_, must be specified if desired
- PLEASE NOTE: table prefixes included in software distributions, such as WordPress'
- the value that prefixes table names within the database
software_workflow:- required: yes
- dependency:
software: - option:
software_workflow: downstream- this option is useful for maintaining a website
- specifies the Production environment and the
masterbranch as the source and automated save point for software files and database - the
masterbranch is automatically merged into thedevelopbranch for convenience
- option:
software_workflow: upstream- this option is useful for launching a new website or maintaining a regulated website
- specifies the Test environment and the
developbranch as the source and automated save point for software files and database - REMINDER: websites with this option will have its Production instance overwritten with software files and datbase from the
masterbranch - see Release Management
webroot:- required: no
- example:
webroot: www/- if the webroot differs from the repo root, specify it here
- must include the trailing slash
Performing development in a local environment is critical to reducing risk by exacting the environments that exist upstream, accomplished with Vagrant and VirtualBox.
Repositories for websites are cloned into the Catapult instance at ~/repositories and in the respective apache or iis folder, listed by domain name.
- Repositories are linked between the host and guest for realtime development.
Catapult enforces software configuration best practice for software fresh installs and updates. A typical software fresh install workflow would be to fork the software project on GitHub and add then add a new website entry to your ~/configuration.yml file. Given the broad spectrum of software requirements there are minor configuration caveats worth noting:
| Software | software_auto_update Support |
Install Approach | Install Notes |
|---|---|---|---|
codeigniter2 |
❌ | ||
codeigniter3 |
❌ | ||
drupal6 |
✅ | Drush | drush dl drupal-6 |
drupal7 |
✅ | Drush | drush dl drupal-7 |
elgg1 |
❌ | Fork | Follow the installation Overview. Catapult requires the dataroot directory to be within the webroot, it's pertinant to create a .gitignore to ignore and .htaccess to deny access to this directory. |
expressionengine3 |
❌ | Download | |
joomla3 |
❌ | Fork | |
laravel5 |
❌ | Composer | Follow the Composer Create-Project documentation. |
mediawiki1 |
❌ | Fork | |
moodle3 |
✅ | Fork | Catapult requires the moodledata directory to be within the webroot, it's pertinant to create a .gitignore to ignore and .htaccess to deny access to this directory. |
silverstripe3 |
❌ | Composer | Follow the Installing and Upgrading with Composer. During a fresh install, the database config file mysite/_config.php will need to be given 0777 permissions. |
suitecrm7 |
❌ | Fork | |
wordpress |
✅ | Fork | |
xenforo |
❌ | Download | |
zendframework2 |
✅ | Fork | Your best bet is to start from the zendframework/ZendSkeletonApplication GitHub project. Catapult assumes Zend Framwork is at the root of your repo and writes a database config file at config/autoload/global.php, you will also need to set webroot: public/ in your Catapult configuration. |
Forcing www is generally software specific, unlike forcing the https protocol, which is environment specific and driven by the force_https option. To force www (why force www?), please follow the respective guides per software below.
For software that does not have specific documentation, please follow this generic .htaccess approach http://stackoverflow.com/a/4958847/4838803
| Software | Approach | Documentation |
|---|---|---|
codeigniter2 |
||
codeigniter3 |
||
drupal6 |
.htaccess |
https://www.drupal.org/node/150215 |
drupal7 |
.htaccess |
https://www.drupal.org/node/150215 |
elgg1 |
||
expressionengine3 |
||
joomla3 |
||
laravel5 |
||
mediawiki1 |
||
moodle3 |
||
silverstripe3 |
mysite/_config.php |
http://api.silverstripe.org/3.1/class-Director.html -> http://stackoverflow.com/a/26865882 |
suitecrm7 |
||
wordpress |
Database | http://codex.wordpress.org/Changing_The_Site_URL |
xenforo |
||
zendframework2 |
The best way to handle changes to the software's database schema is through a migrations system. Database migrations are software specific and are invoked via Catapult for you, here we outline the specifics:
| Software | Tool | Command | Documentation |
|---|---|---|---|
codeigniter2 |
Migrations | php index.php migrate |
https://ellislab.com/codeigniter/user-guide/libraries/migration.html |
codeigniter3 |
Migrations | php index.php migrate |
https://www.codeigniter.com/user_guide/libraries/migration.html |
drupal6 |
Drush | drush updatedb -y |
https://www.drupal.org/node/150215 |
drupal7 |
Drush | drush updatedb -y |
https://www.drupal.org/node/150215 |
elgg1 |
|||
expressionengine3 |
|||
joomla3 |
|||
laravel5 |
Migrations | php artisan migrate |
https://laravel.com/docs/5.0/migrations |
mediawiki1 |
UpdateMediaWiki | php maintenance/update.php |
https://www.mediawiki.org/wiki/Manual:Update.php |
moodle3 |
|||
silverstripe3 |
MigrationTask | php framework/cli-script.php dev/tasks/MigrationTask |
http://api.silverstripe.org/3.3/class-MigrationTask.html |
suitecrm7 |
|||
wordpress |
WP-CLI | wp-cli core update-db |
http://codex.wordpress.org/Creating_Tables_with_Plugins#Adding_an_Upgrade_Function |
xenforo |
|||
zendframework2 |
- Databases are dumped once per day to the
~/_sqlfolder and restored, dependent on the environment andsoftware_workflowsetting per website - see Release Management for details. - Leverage Catapult's workflow model (configured by
software_workflow) to trigger a database refresh. From the develop branch, commit a deletion of today's database backup from the~/_sqlfolder.
Oracle SQL Developer is the recommended tool, to connect to and work with, databases. It is free, commercially supported, cross-platform, and supports multiple database types.
- Download and install Oracle SQL Developer, some platforms require the Java SE Development Kit
- Install third party JDBC drivers: Oracle SQL Developer uses JDBC, via a .jar file, to connect to different database types. To install a new JDBC connector, download the respective .jar file then from Oracle SQL Developer > Preferences > Third Party JDBC Drivers, click Add Entry.4
- MySQL http://dev.mysql.com/downloads/connector/j/5.0.html
- For convenience, you may also use
~/catapult/installers/mysql-connector-java-5.0.8-bin.jar
- For convenience, you may also use
- MSSQL https://sourceforge.net/projects/jtds/files/jtds/
- For convenience, you may also use
~/catapult/installers/jtds-1.3.1.jar
- For convenience, you may also use
- MySQL http://dev.mysql.com/downloads/connector/j/5.0.html
- Connecting to: LocalDev
- The firewall allows direct connection to the database server.
- Use the mysql values in
~/secrets/configuration.ymlto connect.
- Use the mysql values in
- The firewall allows direct connection to the database server.
- Connecting to: Test, QC, Production
- The firewall does not allow direct connect to the database servers.
- Add a New SSH Host in Oracle SQL Developer with the respective environment's web server host public ip address, root username with key file at
~/secrets/id_rsa.- Create a New Local Port Forward with the respective environment's database server host private ip address and port 3306.
- Then add a New Connection with the respective environment's mysql user values in
~/secrets/configuration.yml.- The hostname will be localhost since we are forwarding the port through our local SSH tunnel.
- Add a New SSH Host in Oracle SQL Developer with the respective environment's web server host public ip address, root username with key file at
- The firewall does not allow direct connect to the database servers.
Always weigh the risk of not performing a hotfix versus performing it, as hotfixes require going outside of the normal development and testing workflow. Performing a hotfix varies depending on the website's software type, software_workflow direction, and type of change (code or database).
software_workflow: downstream- Code
- In
~/configuration.yml, temporarily set the environments -> dev -> branch key tobranch: master, and do not commit the change - Provision any related LocalDev servers
- Develop, test, then commit any changes directly to the
masterbranch - Run the Production Bamboo build and verify the release
- Create a pull request and merge the
masterbranch into thedevelopbranch - Set the environments -> dev -> branch key back to
branch: develop - Provision any related LocalDev servers
- In
- Database
- Login to the Production website and make the change
- (any database change that is beyond the direct capability of the
softwareshould not be taken out as a hotfix)
- (any database change that is beyond the direct capability of the
- Login to the Production website and make the change
- Code
software_workflow: upstream- Code
- In
~/configuration.yml, temporarily set the environments -> dev -> branch key tobranch: master, and do not commit the change - Provision any related LocalDev servers
- Develop, test, then commit any changes directly to the
masterbranch - Run the Production build and verify the release
- Create a pull request and merge the
masterbranch into thedevelopbranch - Set the environments -> dev -> branch key back to
branch: develop - Provision any related LocalDev servers
- In
- Database
- Login to the Production and Test website and make the change
- (any database change that is beyond the direct capability of logging into the
softwareand safely making the change, should not be taken out as a hotfix)
- (any database change that is beyond the direct capability of logging into the
- From LocalDev and the
developbranch of the website's repository, commit a deletion of today's (if exists) SQL dump file from within the~/sqlfolder- (this ensures there is a known committed SQL dump of your change to the
developbranch for when this branch is merged upstream)
- (this ensures there is a known committed SQL dump of your change to the
- From LocalDev, temporarily checkout the
masterbranch of the website's repository, make your change in the most recent SQL dump file from within the~/sqlfolder- (this ensures that during the next Production build your change is not overwritten)
- Login to the Production and Test website and make the change
- Code
Often disregarded, performance testing is a crucial component of quality assurance. The risks of neglecting performance testing include downtime, SEO impacts, gaps in analytics, poor user experience, and unknown ability to scale.
With Catapult's exactly duplicated configuration, even the Test environment can accurately represent the performance potential of the Production environment. ApacheBench is a powerful tool to test request performance and concurrency - OSX includes ApacheBench out of the box, while this StackOverflow post details how to get up and running on Windows.
ApacheBench enables us to profile request performance (-n represents the number of requests to perform) and concurrency (-c represents the number of multiple requests to make at a time) to test for performance, including common limits such as C10k and C10M.
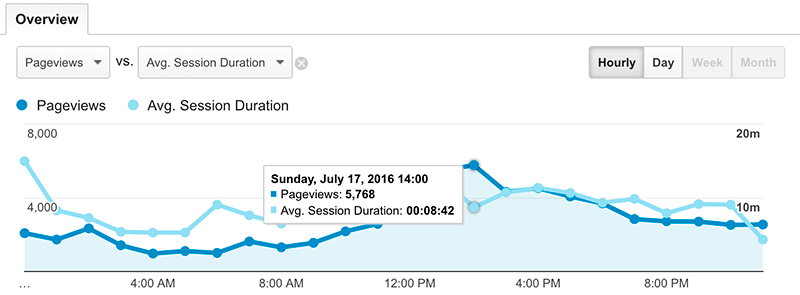
Using a website with historical Google Analytics data, access the Audience Overview and find the busiest Pageview day from the past 30-days and then drill into that date. Find the hour with the most Pageviews, then the accompanying Avg. Session Duration. Using the following formula, we are able to find the Concurrency Maxiumum.
(Pageviews x Avg. Session Duration in seconds) / 3,600 seconds = Concurrency Maxiumum
365,000 pageviews per month
Take a website with an average of 500 pageviews per hour, or 365,000 pageviews per month, which has a busiest hour of 1,000 pageviews.
| Pageviews | Avg. Session Duration | Total Session Seconds | Concurrency Maxiumum |
|---|---|---|---|
| 1,000 | 60 minutes (3,600 seconds) | 3,600,000 | 1,000 |
| 1,000 | 10 minutes (600 seconds) | 600,000 | 166 |
| 1,000 | 5 minutes (300 seconds) | 300,000 | 88 |
| 1,000 | 1 minute (60 seconds) | 60,000 | 16 |
100 concurrent requests performed 10 times
ab -l -r -n 1000 -c 100 -H "Accept-Encoding: gzip, deflate" http://test.drupal7.devopsgroup.io/
14,600 pageviews per month
Take a website with an average of 20 pageviews per hour, or 14,600 pageviews per month, which has a busiest hour of 100 pageviews.
| Pageviews | Avg. Session Duration | Total Session Seconds | Concurrency Maxiumum |
|---|---|---|---|
| 100 | 60 minutes (3,600 seconds) | 36,000 | 1,000 |
| 100 | 10 minutes (600 seconds) | 60,000 | 16 |
| 100 | 5 minutes (300 seconds) | 30,000 | 8 |
| 100 | 1 minute (60 seconds) | 6,000 | 1.6 |
10 concurrent requests performed 10 times
ab -l -r -n 100 -c 10 -H "Accept-Encoding: gzip, deflate" http://test.drupal7.devopsgroup.io/
Using a satisifed Apdex of 7 seconds, we can see that 98% of users would be satisfied.
Percentage of the requests served within a certain time (ms)
  50%     19
  66%     21
  75%     24
  80%     27
  90%     34
  95%   3968
  98%   6127
  99%   7227
 100%   7325 (longest request)
Being able to react to disasters immediately and consistently is crucial - Catapult affords you fast rebuilding and rollbacks.
- LocalDev is rebuildable by running
vagrant destroythenvagrant upfor the respective virtual machine. - Test, QC, and Production are rebuildable by running
vagrant rebuildfor the respective virtual machine - this is necessary (rather than a destroy and up) to retain the IP addresses of the machine.
Production Website Rollbacks:
software_workflow: upstream- Files
- Reverse the offending merge commit from the master branch and run the Production deployment.
- Database
- Reverse the offending merge commit from the master branch and run the Production deployment.
- Note: The Production database is overwritten and restored from the latest sql dump file from Test in the
~/_sqlfolder.
- Files
software_workflow: downstream- Files
- Reverse the offending merge commit from the master branch and run the Production deployment.
- Database
- Reverse the offending database dump auto-commit from the develop branch and manually restore the Production database from the desired sql dump file in the
~/_sqlfolder. - Note: The Production database is dumped once per day when the production build is run.
- Reverse the offending database dump auto-commit from the develop branch and manually restore the Production database from the desired sql dump file in the
- Files
There are many complex compliance and audit standards that are your responsibility to understand and execute. Each Catapult instance is independant to you - including the required services that you signed up for during Services Setup.
Security of the cloud. This is the responsibility of the cloud service.
| Service | Catapult Context | SOC 1 | SOC 2 | SOC 3 |
|---|---|---|---|---|
| AWS EC2 US EAST | Temporary build servers | ✅ | ✅ | ✅ |
| Bamboo | Server communication, log files, secrets | ✅ | ||
| BitBucket | Repository hosting | ✅ | ||
| DigitalOcean NYC3 | Red Hat server hosting | ✅ | ✅ | |
| GitHub | Repository hosting | |||
| New Relic | Server communication, log files | ✅ |
Security in the cloud. This is your responsibility, however, the underlying service must have basic support for the compliance scenario.
| Service | Catapult Context | HIPAA BAA | PCI DSS Level 1 |
|---|---|---|---|
| AWS EC2 | Windows server hosting | ✅ | ✅ |
| CloudFlare (Pro) | Web application firewall | ✅ | |
| Bamboo | Server communication, log files, secrets | ❌ | |
| BitBucket | Repository hosting | ❌ | |
| DigitalOcean NYC3 | Red Hat server hosting | ❓ | ❓ |
| GitHub | Repository hosting | ❓ |
Catapult manages free HTTPS compliments of Cloudflare, however, depending on your compliance needs you may need to purchase SSL certificates unique to your orginazation. Once you're aware of your compliance responsiblity, you can then make a decision for purchasing and implementing SSL certificates. Catapult will soon incorporate the ability to add custom SSL certificates.
| Feature | Domain Validation (DV certificates) | Organization Validation (OV certificates) | Extended Validation (EV certificates) |
|---|---|---|---|
| Single Domain Certificate | ✅ | ✅ | ✅ |
| Wildcard Certificate | ✅ | ✅ | ❌ |
| Multiple Domain Certificate | ✅ | ✅ | ✅ |
| Cost | $ | $$ | $$$ |
| Issuing Process | Automatic | Application vetted by Certificate Authority | Application vetted by Certificate Authority |
| Issuing Criteria: Domain Name(s) Ownership | ✅ | ✅ | ✅ |
| Issuing Criteria: Organization Existence | ❌ | ✅ | ✅ |
| Issuing Criteria: Organization Legal Existence | ❌ | ❌ | ✅ |
| Industry Accepted Issuing Standard | ❌ | ❌ | CAB EV SSL Certificate Guidelines |
| Standard Browser Padlock | ✅ | ✅ | ❌ |
| Greenbar Browser Padlock | ❌ | ❌ | ✅ |
| Browser Compatibility | Google Chrome 1+, Mozilla Firefox 1+, Internet Explorer 5+ | Google Chrome 1+, Mozilla Firefox 1+, Internet Explorer 5+ | Google Chrome 1+, Mozilla Firefox 3+, Internet Explorer 7+ |
Catapult introduces many best practice security measures, however, security of customer data is ultimately your responsibility. Generally speaking, if personal information is compromised, you are required by law to notify the party. Personal information, in the United States, is generally classified as an individual's first and last name in combination with a Social Security number, driver's license number, or financial account number. Laws vary country-by-country and state-by-state - for more information please see this list of data breach laws by U.S. state compiled by IT Governence.
See an error or have a suggestion? Email [email protected] if confidential or submit a pull request - we appreciate all feedback.
Below is a log of service related troubleshooting. If you're having issues related to Catapult, submit a GitHub Issue.
- DigitalOcean
- [09-01-2015] vagrant rebuild was failing with a
The configured shell (config.ssh.shell) is invalid and unable to properly execute commands.it is due to DigitalOcean's API not re-inserting the SSH key that was originally used during the first vagrant up (creation of the droplet). To rebuild, you must use the DigitalOcean console, run through the first root password reset workflow that was emailed to you, then vi /etc/sudoers and remove theDefaults requirettyline and save and exit. You can then run vagrant provision successfully.
- [09-01-2015] vagrant rebuild was failing with a
- GitHub
- [09-08-2015] Some database dumps exceed 100MB, so it's recommened to use Bitbucket in those instances as Catapult auto-commits database dumps to your website's repository, up to 500MB worth of database dumps or the one, newest database dump. Bitbucket has a 2GB hard repo push limit with no documented file limit and GitHub has a 1GB soft repo limit with a 100MB file size limit.
- Vagrant
- [02-04-2015] When upgrading Vagrant you may run into errors - the most common issue are mismatched plugins, running this command has a good chance of success
sudo rm -Rf ~/.vagrant.d/gems/ && sudo rm ~/.vagrant.d/plugins.json
- [02-04-2015] When upgrading Vagrant you may run into errors - the most common issue are mismatched plugins, running this command has a good chance of success
Here are some ways which we welcome you to contribute to Catapult:
- Submit a pull request
- Report an issue
- Provide feedback on open issues
- Improve documentation in the README
- Share your experiences with Catapult
When you first setup Catapult, a develop-catapult branch is created for you under your forked repository with the git remote upstream set to https://github.com/devopsgroup-io/catapult.git so that you can easily create a pull request. Also keep in mind when closing issues to submit a pull request that includes GitHub's: Closing issues via commit messages.
Releases are driven by the devopsgroup.io team and occur when accepting new pull requests from contributors like you. Releases follow Semantic Versioning 2.0.0. Given a version number MAJOR.MINOR.PATCH, increment the:
- MAJOR version when you make incompatible API changes,
- MINOR version when you add functionality in a backwards-compatible manner, and
- PATCH version when you make backwards-compatible bug fixes.
In addition, the release version number will be prefaced with a v (v1.0.0) to conform to standard practice.
As part of a new release, the version number in ~/VERSION.yml will be incremented and git tagged with the same version number along with a GitHub Release.
The Catapult team values partnerships and continuous improvement.
- [06-03-2016] New Relic creates request on Catapult's behalf for a free entry point for the New Relic Synthetics API
- [01-28-2016] Pantheon provides feedback
- [01-22-2016] New Relic provides private beta access to their Synthetics API along side Breather, Carfax, Ring Central, Rackspace, and IBM.
Catapult is making the conference tour! We plan to attend the following conferences, with more to come. Get a chance to see Catapult in action, presented by it's core developers.
- Spring 2016 [04-08-2016] Drupaldelphia: DevOps Discipline: Detailed and Complete
- Winter 2016 WordCamp US
Catapult will also be seen throughout local meetups in the Philadelphia and Greater Philadelphia area! Get a chance to meet the team and engage at a personal level.
- Technical.ly Philly 6k+ technologists
- Tech in Motion Philly 4k+ technologists
- Philadelphia WordPress Meetup Group 1.5k+ technologists
- Philly DevOps 1k+ technologists
- Greater Philadelphia Drupal Meetup Group .5k+ technologists
- Atlassian. Comparing Workflows. https://www.atlassian.com/git/tutorials/comparing-workflows/gitflow-workflow. Accessed February 15, 2016.
- Pantheon. Load and Performance Testing: Before You Begin. https://pantheon.io/docs/articles/load-and-performance-testing/. Accessed February 20, 2016.
- Acquia. Acquia Dev Desktop. https://www.acquia.com/products-services/dev-desktop. Accessed February 20, 2016.
- Oracle Technology Network. Oracle SQL Developer Migrations: Getting Started. http://www.oracle.com/technetwork/database/migration/omwb-getstarted-093461.html#conf. Accessed March 14, 2016.